Import Multiple Store in Magento Store Locator

Purpletree Store Locator for Magento allows admin to add stores and that stores would be visible in front and customer could see a listing of all stores with their address and other details added by Admin along with an address on Google maps which is integrated into our extension. There are two pages in the frontend for customers 1 is the listing of all the stores and the other is each store Detail page. The listing page contains store address with Google maps with basic information and in Store detail page Store detail with Address along with Google Map address and Store Description also as added by admin.
Adding Store from admin is too easy admin could add each address from Store Form in admin > Storelocator > Manage Stores. From here Add or Edit the store, you can also delete the store from the store locator listing page.
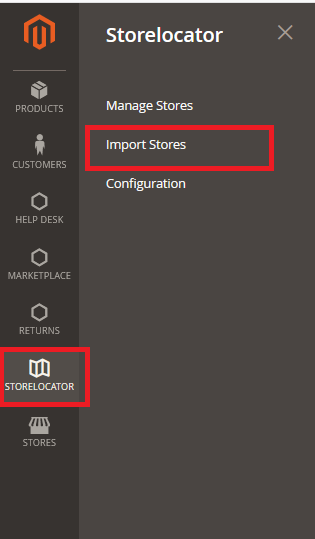
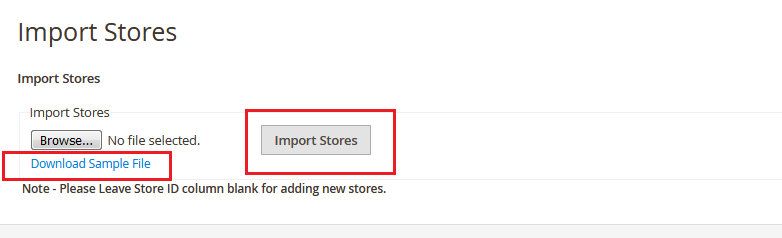
To add/edit multiple stores at a time admin could add/edit it using bulk import in CSV File, for go to Admin Panel > Storelocator > Import Stores. To view the format of CSV File you can download Sample File from here.
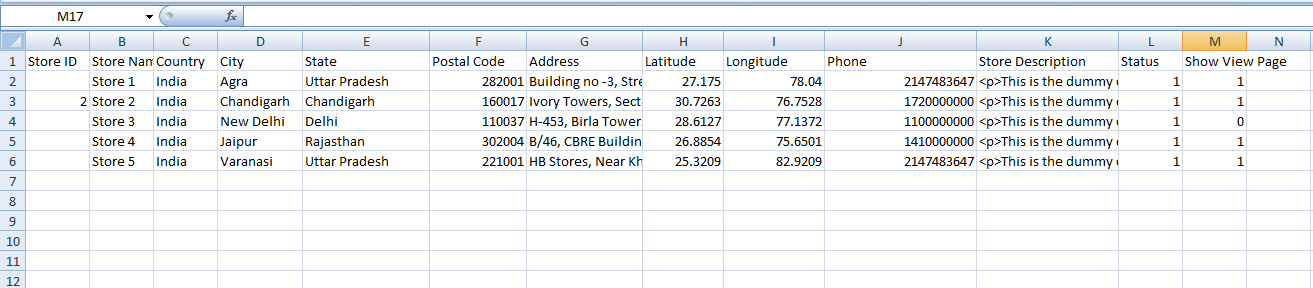
You can edit the Sample CSV file downloaded and can use that file Upload, fields in the CSV file are explained as below.
Store ID – Use store ID only in case of Edit store, if Store is already added in the Stores and is visible in admin, either it is enabled or disabled is not as matter, Enter Store ID for that store to edit any store. Leave the Store ID blank to add a new store.
Store Name – Enter Store Name in this field, this would be the name of the store visible in front. This is a required field and cannot be left blank.
Country - Enter any country name in this field that would be visible in the frontend. This is a required field and cannot be left blank.
City - Enter the Store city in this field, you can enter any text in this field and would be visible in front. This is a required field and cannot be left blank.
State - This would be the State or you can say, Province, enter here valid State/province. This is a required field and cannot be left blank.
Postal Code - Enter Zip code/ Postal code in this file. This is a required field and cannot be left blank.
Address - Enter a full address in this field which would be visible in the frontend. This is a required field and cannot be left blank.
Latitude – This is used to show Accurate address on Google maps which is integrated into our extension. This is a required field and cannot be left blank.
Longitude - This is also used to show Accurate address on Google maps which is integrated into our extension. This is a required field and cannot be left blank.
Phone – Enter the valid Telephone number of the Store. This is a required field and cannot be left blank.
Store Description – Enter Store Description in this field, you can enter any content in HTML in this field, please make sure that all HTML tags are properly entered in this field.
Status – Enter Status in this field, Enter 0 for Disabled, and to enable the Store Enter 1 in this field.
Show View Page – To Enable the Store View page in the frontend enter 1 in this field and to disable the Store View page Enter 0 in this field.
Now Save the CSV File and upload it on Import Stores Page, Browse the Saved CSV File, and Click Import Stores to Add and Edit the stores added in the CSV File.
More Details of Magento 2 store locator another related blogs below: