Managing Stores in Store Locator Magento 2

The Store Locator feature in Magento 2 is a powerful tool for eCommerce businesses that have multiple physical locations. It allows customers to find stores near them, view store details, and even get directions. Managing stores within the Store Locator is a straightforward process, but understanding each step and its benefits can significantly enhance your store’s visibility and user experience.
How to Add and Manage Stores
To manage your stores, navigate to Storelocator > Manage Stores in the Magento 2 admin panel. This section will guide you on adding new stores and managing existing ones.
Explore More Information about Purpletree Store Locator for Magento 2
1. Adding a New Store
-
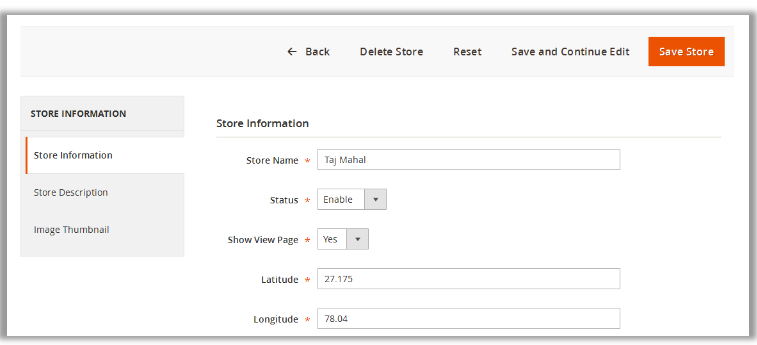
Click on "Add New Store" Button: This will open a form where you can input all the necessary details for your store.
-
Enter Store Details:
- Status: Set this to "Enable" to ensure the store is visible on the frontend. An enabled store will appear in the store locator for customers to see.
- Show View Page: Enable this option if you want a dedicated page for the store, allowing customers to view more detailed information by clicking the "View Detail" link on the Store Locator page.
- Latitude and Longitude: Enter the exact geographical coordinates of the store. You can obtain these from Google Maps (e.g., Latitude: 28.11234, Longitude: 72.5552). For more information on finding coordinates, refer to Google Maps Help.
- Store Description: Provide a brief description of the store. This will be shown on the single view page, giving customers an overview of what the store offers.
- Image Thumbnail: Upload an image that represents the store. This image will appear on the store's single view page.
-
Save the Store: Once all details are entered, click "Save."
2. Managing Existing Stores
- Edit Store Details: To edit an existing store, simply click on the store name in the Manage Stores list. You can modify any details as needed, such as updating the address or changing the status.
- Enable/Disable Stores: You can enable or disable stores depending on whether you want them to appear in the frontend store locator.
- Delete Stores: If a store location is no longer needed, you can delete it from the Manage Stores list.
3. Refresh Magento Cache
After adding or editing a store, it’s crucial to refresh your Magento cache. If the store is not visible on the frontend, this step often resolves the issue. Ensure the store's status is set to "Enable" before refreshing the cache.
Benefits of Managing Stores in Store Locator
1. Enhanced Customer Experience
Providing accurate store details, including descriptions and images, helps customers make informed decisions. A well-maintained Store Locator improves the shopping experience by making it easy for customers to find the nearest store and view its offerings.
2. Improved Store Visibility
Enabling the "Show View Page" option for each store gives you an additional page on your website, which can be optimized for search engines. This improves the visibility of each store location in search results, driving more traffic to your physical stores.
3. Efficient Store Management
Magento 2's Store Locator allows for easy management of multiple store locations. With a centralized system, you can quickly update store information, ensuring that customers always have access to the most current details.
Conclusion
Managing stores within the Magento 2 Store Locator is an essential task for any multi-location business. By following the steps outlined above, you can ensure that your stores are correctly displayed, helping to drive foot traffic and enhance customer satisfaction. Don't forget to keep your store information up-to-date and to refresh your Magento cache after making changes.