How Vendors Manage Orders, Invoices, and Shipping in Your Marketplace

In a multi-vendor marketplace, vendors are responsible for managing their own orders—from viewing order details to generating invoices and shipping products. This blog explains how the vendor order process works step-by-step, helping both sellers and admins understand how to run a smooth and efficient marketplace.
This article explains how vendors can manage their product orders, generate invoices, and handle shipping from their vendor panel in the marketplace.
What is a Multi-Vendor Marketplace?
A Multi-Vendor Marketplace allows multiple independent sellers (vendors) to register and sell their products through one single eCommerce platform. Each vendor gets their own dashboard to manage products, orders, and profile without needing access to the admin area.
Meanwhile, the admin controls the entire marketplace, including:
-
Vendor approval and management
-
Product visibility across the storefront
-
Commission setup and tracking
-
Vendor payouts and settlement
This setup transforms your store into a complete, feature-rich, scalable multi-seller marketplace, fully compatible with standard Magento 2 themes. It allows seamless collaboration between sellers and the admin while ensuring full control and support.
Vendor Order Processing Overview
Vendors have full control over order processing from their panel. They can:
-
View orders placed by customers.
-
Generate and submit invoices.
-
Check the shipping method selected by the customer.
-
Ship the order using the same shipping method (manually).
This allows vendors to operate independently and efficiently while fulfilling customer orders.
Step-by-Step Instructions
1. Accessing Orders
-
Login to your vendor account.
-
Navigate to the "Orders" section in your vendor dashboard.
-
You will see a list of all orders placed for your products.
Each order includes the customer name, order ID, status, date, and a link to view more details.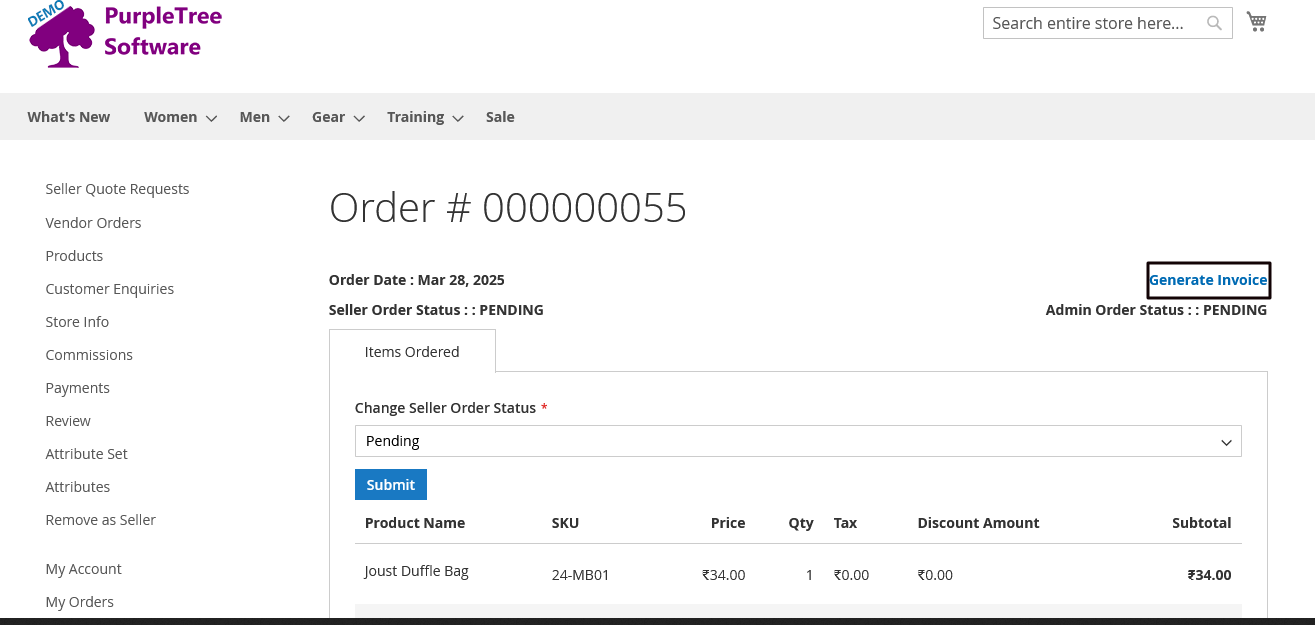
2. Viewing Order Details
-
Click on the "View" button next to the order you want to process.
-
This opens the order detail page, where you can see all important information:
-
Ordered products
-
Quantity
-
Pricing
-
Customer shipping and billing details
-
Shipping method selected by the customer
-
Review this information carefully before proceeding.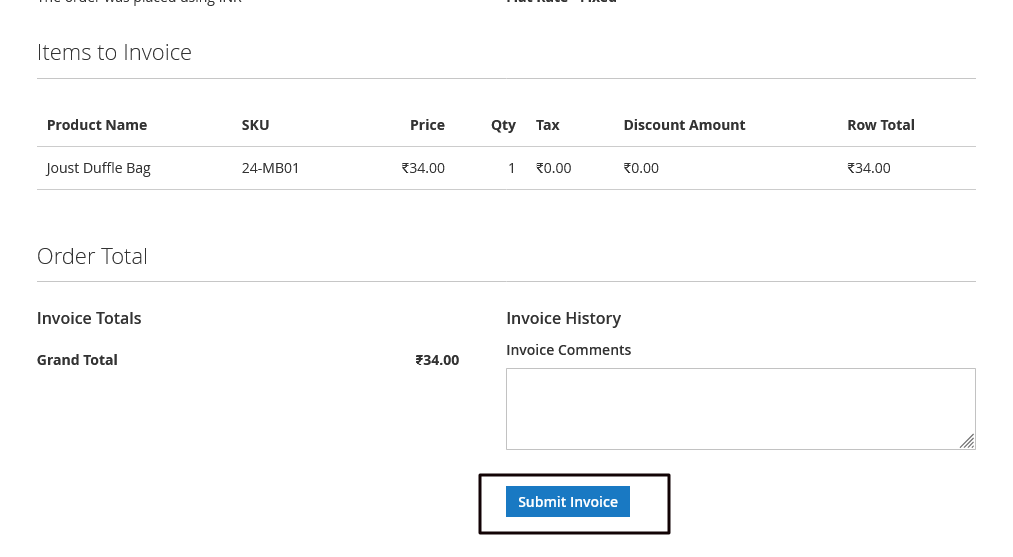
3. Generating an Invoice
-
On the same order details page, look for the "Generate Invoice" option.
-
Click on "Generate Invoice".
-
A form will appear. Confirm the information and click "Submit Invoice".
-
Once submitted, the system will generate an invoice number.
-
You can download or print the invoice as needed for your records or to include with the shipment.
Invoicing is necessary before moving to the shipping stage.
4. Checking the Shipping Method
After the invoice is submitted, scroll down the order details page to check the Shipping Method used by the customer at the time of placing the order.
Some examples:
-
Flat Rate Shipping
-
Free Shipping
-
USPS, FedEx, DHL, etc. (if enabled)
This helps you know how to ship the order. You should use the same method to dispatch the product for a smoother customer experience (manually).

5. Shipping the Order
Based on the selected shipping method, pack the product and ship it using your shipping provider.
Update the order status if required.
Important Notes
-
Vendors can only see orders for their own products.
-
Admin may enable or restrict certain functions based on platform settings.
-
Always ensure the invoice is generated before shipping.
-
Use the same shipping method as shown in the order to avoid delivery issues or customer confusion.
Conclusion
With vendor dashboards and admin controls working together, the multi-vendor marketplace setup makes order processing smooth and independent for sellers. This results in faster fulfillment, greater transparency, and a better customer experience.
For any questions or help, please reach out to our support team.